Hello, my readers. After posted about PRODUCT PHOTOGRAPHY FOR BLOGGERS last week, today I want to share you another BLOG 101 about HOW TO FIX BLURRY PICTURES.
For us, not bloggers only I think, the blurry pictures is familiar when taking pictures. When you are satisfied with your pictures and then you disappointed because it's blurry, what should you do? Are you take other pictures? No. It is not effective. It wastes time in my opinion. You don't have to take other pictures to get the perfect ones. The thing you should do is editing. I have tips about how to fix the blurry pictures here. Just follow my easy steps below.
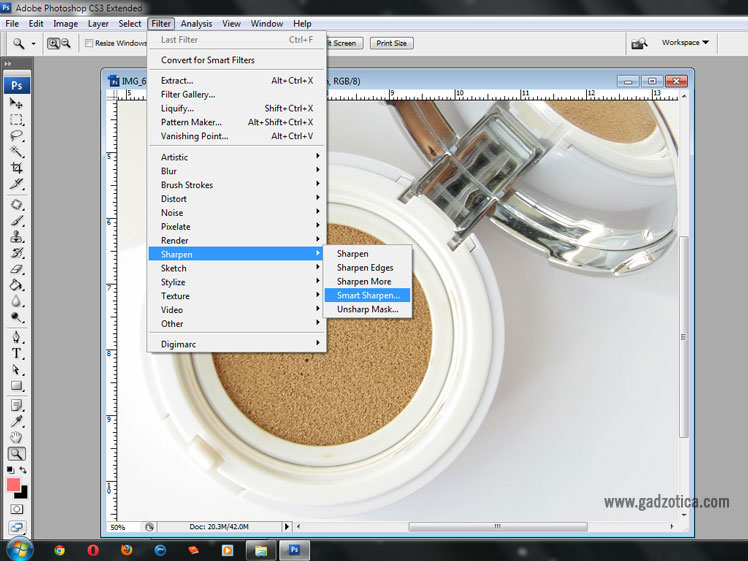
I use Adobe Photoshop CS3 to edit my pictures.
1. First, duplicate your pictures.
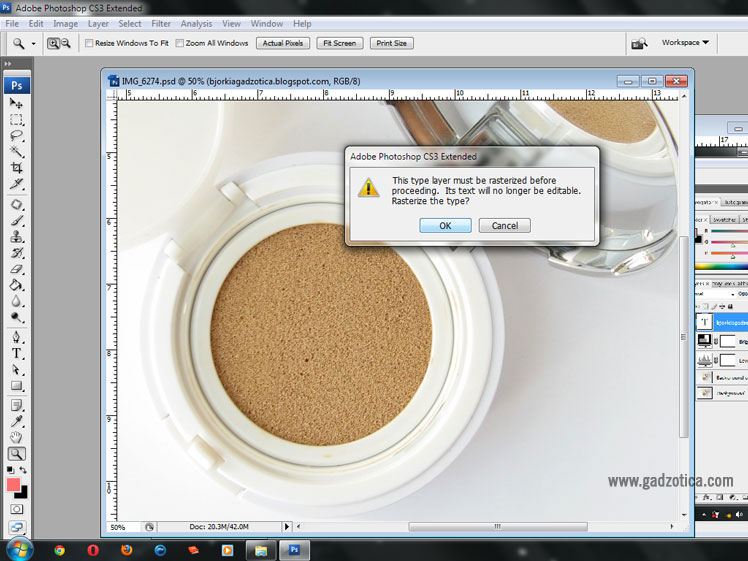
3. . When you see this notification, click OK
4. Now Smart Sharpen Tab is open. Change the RADIUS as you desire. I usually put 2.0 or 3.0. It depends on your pictures condition. Radius 3.0 maybe too sharp on Photoshop, but don't worry. It's not that sharp when you decreased the pixel size. Don't forget to change "the remove" with GAUSSIAN BLUR. Make sure everything set then click OK.
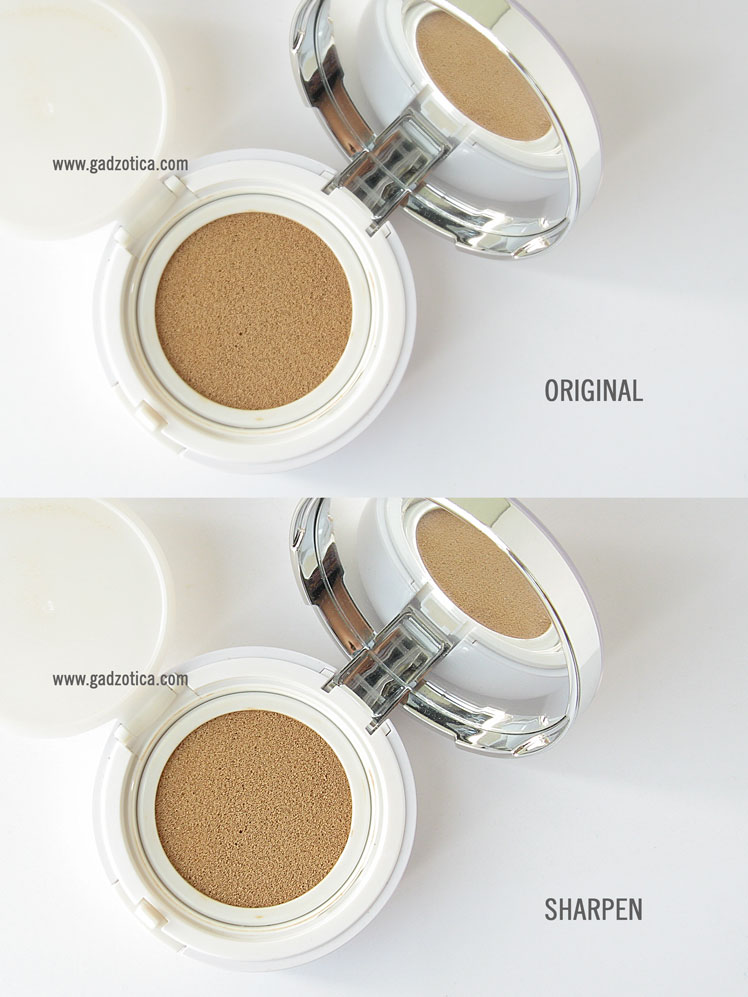
Now here is the result between original picture and sharpen one
What do you think? Which is better? Does the sharpen one looks more appealing? Do you use this trick too? Please feel free to share your tips to fix blurry pictures.
Thank you for reading. I hope this post is helpful. See you on the next post ^^

 Blog 101,
Photography,
Tips





wah keren2
BalasHapusthanks for share sis :D
jadi nambah ilmu hihi :)
www.holalia.com
Hihihi sama-sama say.. Semoga membantu yahh :D
HapusAwesome tutorial!
BalasHapus-Abigail
livingthegraylife.wordpress.com
Thank for stopping by dear. Hope it's helpful ^^
HapusOMG thank you so much for doing this!!! Again, so precise and in-depth!!! Thank you! - Hari
BalasHapusI hope this tutorial is helpful. Thank for stopping by, Hari ^^
HapusNice tip! I'll try it soon, thank you so much for sharing! xD
BalasHapusBtw, mind following each other? Let me know! :)
Regards,
a-cupofrain.blogspot.com
Thank for visiting hun, I followed you :)
HapusThanks so much for sharing these great tips!
BalasHapusCandice | Beauty Candy Loves
You're welcome dear :)
HapusI followed you dear Rabea. Thank for visiting ^^
HapusOh wow this is a great tip
BalasHapusThanks for share with us
xx
www.sakuranko.com
You're welcome dear. Thank for stopping by :)
HapusThank you for sharing, I'm always interested to learn new ways to fix my pictures.Pinning.
BalasHapusYou're welcome dear. Hope it's helpful ^^
HapusThank you for the help, I hate when a picture's layout looks great and they turn out blurry. This will deff help !
BalasHapuswww.avenue50.com
You're welcome, dear. Thank you for stopping by and good luck :)
Hapusooh, that's a great tip! thanks for sharing this!
BalasHapushave a great weekend Gadis :)
xoxo,
Beauty Appetite
You're welcome Kak Jes. Have a great weekend too ^^
HapusKak, request dong setting untuk foto produk hihi.
BalasHapusSiip segera yaa ^^
Hapus